Difference between revisions of "Highley signal box"
m (Typo) |
|||
| (32 intermediate revisions by 9 users not shown) | |||
| Line 1: | Line 1: | ||
| − | Highley Signal Box (HY) is an original McKenzie and Holland Type 3 signal box, built in 1883. It is situated opposite [[Highley|Highley station]]. | + | [[File:Highley_Signal_Box_20170618.jpg |thumb|300px|right| Highley Signal Box]] |
| + | '''Highley Signal Box''' (HY) is an original McKenzie and Holland Type 3 signal box, built in 1883. It is situated opposite [[Highley|Highley station]]. It works to [[Hampton Loade signal box|Hampton Loade]] and [[Arley signal box|Arley]] on short section working, and to [[Bridgnorth signal box|Bridgnorth]] and [[Bewdley North signal box|Bewdley North]] on the long sections using [[Single line working using tokens|ETT regulations]]. | ||
| − | == | + | == History == |
| + | [[File: Mile_Post_2.jpg |thumb|150px|right|Milepost at Highley Signal Box]] | ||
| + | A [[Gradient profile and mileages#Milepost|milepost]] is situated at the foot of Highley signal box, showing that the location is exactly 143¼ miles from Paddington. The flat area of land which the box occupies was formerly the site of a stone quarry for which a [[Stone quarry siding opposite Highley Station|private siding]] was provided in 1880 but which closed within a year. In August 1882 the GWR Board approved the provision of additional sidings and the signal box, which were commissioned on 25 June 1883.<ref name=JM>[[Bibliography#Books|Marshall (1989)]] p. 99.</ref> | ||
| + | <ref name="SRSSignalBoxRegister_Update9">Signal Box Register, Volume 1: Great Western, revised 2011 edition, Signalling Record Society (plus correction sheet #9 )</ref> The box has not changed significantly since that time, with the exception of modifications to the interlocking of the lever frame. | ||
| − | + | The box previously controlled access to Highley's [[Collieries served by the Severn Valley Railway#Highley Colliery|colliery exchange sidings]] where [[The Engine House]] now stands. Two ground frames were commissioned on 30 January 1939 in the section to Hampton Loade, allowing access to [[Alveley Sidings]], namely [[Alveley Sidings (South) ground frame|Alveley Sidings (South)]] and [[Alveley Sidings (North) ground frame|Alveley Sidings (North)]]. An intermediate token instrument was provided to allow trains to be locked in to these sidings. The North ground frame was taken out of use in 1974, whilst the South ground frame survived until an unknown later date, released on the Highley-Hampton Loade token. | |
| − | + | The box was closed by BR in 1969 with the ending of coal traffic from Alveley. BR were already aware of the SVR's intention to take on the southern section of the line, so in December 1972 the SVR acquired "''...a virtually intact and working box together with all the original signals and associated track and point work''".<ref name=SVR29>SVR News 29</ref> The outside of the box was repainted in traditional GWR colours, while Arley’s Barry Geens carried out a meticulous restoration of the wood and brass work on the block instrument shelf.<ref name=SVR29/> The box was brought back into use on 2 March 1974<ref>SVR News 31</ref> with the commissioning of ETT working to Hampton Loade, in time for passenger services to Highley to begin in April 1974. Passenger services were extended to Arley and Bewdley the following month, although without ETT working. Long section working to Bridgnorth was brought into use in 1975, and ETT working to Arley and Bewdley North was commissioned on 10 April 1976. | |
| − | + | The interior was used for filming in 1974 of the atmospheric TV film [[The Signalman]], starring Denholm Elliot and closely following Dickens' work of the same title. It also featured in an episode of [[Survivors]]. | |
| − | The box works in both directions using Electric Token Block regulations, and is fitted with four Tyer's No. 9 token instruments. In the Up direction, Highley works to either [[Arley signal box|Arley]] ( | + | == Operation and equipment == |
| + | |||
| + | === Lever frame === | ||
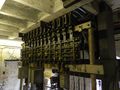
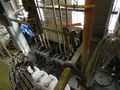
| + | Highley retains its original 14 lever McKenzie and Holland 1873 patent lever frame, with 11 working levers, 3 spare, and no spaces. The interlocking was replaced with GWR 5-bar vertical tappet interlocking in 1947. <ref name="SRSSignalBoxRegister_Update9" /> | ||
| + | <gallery> | ||
| + | File:Highley box interior 2.jpg | Interlocking mechanism | ||
| + | File:Highley box interior 1.jpg | Point rodding and bell cranks | ||
| + | </gallery> | ||
| + | |||
| + | === Block sections === | ||
| + | The box works in both directions using Electric Token Block regulations, and is fitted with four Tyer's No. 9 token instruments. In the Up direction, Highley works to either [[Arley signal box|Arley]] (short section), or [[Bewdley North signal box|Bewdley North]] (long section) when Arley box is switched out. The Highley-Bewdley North long section token unlocks Arley signal box so it may operate as a ground frame, allowing for access to the yard when that box is switched out. An intermediate token instrument is provided to allow trains to be locked in. In the Down direction, the section is to [[Hampton Loade signal box|Hampton Loade]] (short section), or [[Bridgnorth signal box|Bridgnorth]] (long section) when Hampton Loade is switched out. The Highley-Bridgnorth long section token unlocks a 2-lever ground frame at [[Eardington]], allowing access to the siding located there. Although passenger services cannot cross at Highley, Highley box itself cannot be switched out when these are operating. | ||
| + | |||
| + | === Signalling diagram === | ||
| + | [[File:HYDiagram.jpg|400px|thumb|none|The diagram in Highley signal box]] | ||
| + | [[File:Highley box diagram.gif|800px|thumb|none|Diagram from the SVR Unofficial S&T Department website]] | ||
| + | Note there are inaccuracies in both diagrams: the original diagram is missing the siding behind the signal box, and the S&T website diagram shows number 7 signal as a red disc, when it has been replaced by a yellow one. | ||
| + | |||
| + | ==Signalling controlled from the box== | ||
| + | The down starting signal is a rare GWR concrete post signal, as used fairly extensively on the Cambrian Coast line, and the down fixed distant is a standard GWR wooden post design, otherwise all signals are of late GWR/BR(W) steel tubular post and enamel arm design. | ||
| + | |||
| + | == Levers & lever frames == | ||
| + | |||
| + | {| class="wikitable" | ||
| + | ! style="text-align:left;" | No. !! style="text-align:left;" | Colour !! style="text-align:left;" | Description !! style="text-align:left;" | Lever Sequence | ||
| + | |- | ||
| + | | 1 || White || Spare || | ||
| + | |- | ||
| + | | 2 || Red || Up Main Home || 4 | ||
| + | |- | ||
| + | | 3 || Red with white band || Up Main Starting || | ||
| + | |- | ||
| + | | 4 || Blue || FPL for 5 || | ||
| + | |- | ||
| + | | 5 || Black || Up Main Facing / To No. 1 Siding || | ||
| + | |- | ||
| + | | 6 || White || Spare || | ||
| + | |- | ||
| + | | 7 || Red with white band || Down Disc for 5 || 5 | ||
| + | |- | ||
| + | | 8 || Red with white band || Up Disc for 10 || 10 | ||
| + | |- | ||
| + | | 9 || White || Spare || | ||
| + | |- | ||
| + | | 10 || Black || Down Main Facing / To No. 1 Siding || Nil or 11 | ||
| + | |- | ||
| + | | 11 || Blue || FPL to 10 || Nil or 10 | ||
| + | |- | ||
| + | | 12 || Red with white stripe || Down Main Starting || | ||
| + | |- | ||
| + | | 13 || Red || Down Main Home || 11 | ||
| + | |- | ||
| + | | 14 || Red || Down Disc to No. 1 Siding Home || 10 11 | ||
| + | |} | ||
| + | |||
| + | == See also == | ||
| + | *[[List of signal boxes]] | ||
== References == | == References == | ||
| + | <references/> | ||
| + | * "Hampton Loade". Signal box profile on the Severn Valley Railway S&T Department (unofficial) website. [http://www.svrsig.org/svr/Frame7.htm Link]. Accessed 05/01/2015. | ||
| + | * "Highley". Signal box profile on the Severn Valley Railway S&T Department (unofficial) website. [http://www.svrsig.org/svr/Frame6.htm Link]. Accessed 05/01/2015. | ||
| + | * Minnis, John (2012). "Railway Signal Boxes, a Review". English Heritage Research Report Series no. 28-2012. [http://services.english-heritage.org.uk/ResearchReportsPdfs/028-2012WEB.pdf Link]. Accessed 05/01/2015. | ||
| + | * Waugh, Andrew. "McKenzie & Holland 1873 Patent Frames". [http://www.highleystation.co.uk/frame.pdf Link]. Accessed 05/01/2015. | ||
| − | + | [[Category:Featured articles]] | |
| − | |||
Revision as of 22:22, 5 October 2020

Highley Signal Box (HY) is an original McKenzie and Holland Type 3The British Railways classification for diesel locomotives of 1500 bhp to 1999 bhp signal box, built in 1883. It is situated opposite Highley station. It works to Hampton Loade and Arley on short section working, and to Bridgnorth and Bewdley North on the long sections using ETT regulations.
History

A milepost is situated at the foot of Highley signal box, showing that the location is exactly 143¼ miles from Paddington. The flat area of land which the box occupies was formerly the site of a stone quarry for which a private siding was provided in 1880 but which closed within a year. In August 1882 the GWRGreat Western Railway Board approved the provision of additional sidings and the signal box, which were commissioned on 25 June 1883.[1] [2] The box has not changed significantly since that time, with the exception of modifications to the interlocking of the lever frame.
The box previously controlled access to Highley's colliery exchange sidings where The Engine House now stands. Two ground frames were commissioned on 30 January 1939 in the section to Hampton Loade, allowing access to Alveley Sidings, namely Alveley Sidings (South) and Alveley Sidings (North). An intermediate token instrument was provided to allow trains to be locked in to these sidings. The North ground frame was taken out of use in 1974, whilst the South ground frame survived until an unknown later date, released on the Highley-Hampton Loade token.
The box was closed by BRBritish Rail or British Railways in 1969 with the ending of coal traffic from Alveley. BRBritish Rail or British Railways were already aware of the SVRSevern Valley Railway's intention to take on the southern section of the line, so in December 1972 the SVRSevern Valley Railway acquired "...a virtually intact and working box together with all the original signals and associated track and point work".[3] The outside of the box was repainted in traditional GWRGreat Western Railway colours, while Arley’s BarryWoodham Brothers Scrapyard, Barry, South Wales. The source of many locomotives now in preservation. Geens carried out a meticulous restoration of the wood and brass work on the block instrument shelf.[3] The box was brought back into use on 2 March 1974[4] with the commissioning of ETTElectric Train Token working to Hampton Loade, in time for passenger services to Highley to begin in April 1974. Passenger services were extended to Arley and Bewdley the following month, although without ETTElectric Train Token working. Long section working to Bridgnorth was brought into use in 1975, and ETTElectric Train Token working to Arley and Bewdley North was commissioned on 10 April 1976.
The interior was used for filming in 1974 of the atmospheric TV film The Signalman, starring Denholm Elliot and closely following Dickens' work of the same title. It also featured in an episode of Survivors.
Operation and equipment
Lever frame
Highley retains its original 14 lever McKenzie and Holland 1873 patent lever frame, with 11 working levers, 3 spare, and no spaces. The interlocking was replaced with GWRGreat Western Railway 5-bar vertical tappet interlocking in 1947. [2]
Interlocking mechanism
Point rodding and bell cranks


Block sections
The box works in both directions using Electric Token Block regulations, and is fitted with four Tyer's No. 9 token instruments. In the UpIn reference to the direction of travel means towards the major terminus (i.e. towards Kidderminster on the present day SVR) direction, Highley works to either Arley (short section), or Bewdley North (long section) when Arley box is switched out. The Highley-Bewdley North long section token unlocks Arley signal box so it may operate as a ground frame, allowing for access to the yard when that box is switched out. An intermediate token instrument is provided to allow trains to be locked in. In the DownIn reference to the direction of travel means away from the major terminus (i.e. towards Bridgnorth on the present day SVR) direction, the section is to Hampton Loade (short section), or Bridgnorth (long section) when Hampton Loade is switched out. The Highley-Bridgnorth long section token unlocks a 2-lever ground frame at Eardington, allowing access to the siding located there. Although passenger services cannot cross at Highley, Highley box itself cannot be switched out when these are operating.
Signalling diagram


Note there are inaccuracies in both diagrams: the original diagram is missing the siding behind the signal box, and the S&TSignals & Telegraph website diagram shows number 7 signal as a red disc, when it has been replaced by a yellow one.
Signalling controlled from the box
The down starting signal is a rare GWRGreat Western Railway concrete post signal, as used fairly extensively on the Cambrian Coast line, and the down fixed distant is a standard GWRGreat Western Railway wooden post design, otherwise all signals are of late GWRGreat Western Railway/BRBritish Rail or British Railways(W) steel tubular post and enamel arm design.
Levers & lever frames
| No. | Colour | Description | Lever Sequence |
|---|---|---|---|
| 1 | White | Spare | |
| 2 | Red | UpIn reference to the direction of travel means towards the major terminus (i.e. towards Kidderminster on the present day SVR) Main Home | 4 |
| 3 | Red with white band | UpIn reference to the direction of travel means towards the major terminus (i.e. towards Kidderminster on the present day SVR) Main Starting | |
| 4 | Blue | FPLFacing Point Lock, equipment that physically locks points so that they cannot move. for 5 | |
| 5 | Black | UpIn reference to the direction of travel means towards the major terminus (i.e. towards Kidderminster on the present day SVR) Main Facing / To No. 1 Siding | |
| 6 | White | Spare | |
| 7 | Red with white band | DownIn reference to the direction of travel means away from the major terminus (i.e. towards Bridgnorth on the present day SVR) Disc for 5 | 5 |
| 8 | Red with white band | UpIn reference to the direction of travel means towards the major terminus (i.e. towards Kidderminster on the present day SVR) Disc for 10 | 10 |
| 9 | White | Spare | |
| 10 | Black | DownIn reference to the direction of travel means away from the major terminus (i.e. towards Bridgnorth on the present day SVR) Main Facing / To No. 1 Siding | Nil or 11 |
| 11 | Blue | FPLFacing Point Lock, equipment that physically locks points so that they cannot move. to 10 | Nil or 10 |
| 12 | Red with white stripe | DownIn reference to the direction of travel means away from the major terminus (i.e. towards Bridgnorth on the present day SVR) Main Starting | |
| 13 | Red | DownIn reference to the direction of travel means away from the major terminus (i.e. towards Bridgnorth on the present day SVR) Main Home | 11 |
| 14 | Red | DownIn reference to the direction of travel means away from the major terminus (i.e. towards Bridgnorth on the present day SVR) Disc to No. 1 Siding Home | 10 11 |
See also
References
- ↑ Marshall (1989) p. 99.
- ↑ 2.0 2.1 Signal Box Register, Volume 1: Great Western, revised 2011 edition, Signalling Record Society (plus correction sheet #9 )
- ↑ 3.0 3.1 SVRSevern Valley Railway News 29
- ↑ SVRSevern Valley Railway News 31
- "Hampton Loade". Signal box profile on the Severn Valley Railway S&TSignals & Telegraph Department (unofficial) website. Link. Accessed 05/01/2015.
- "Highley". Signal box profile on the Severn Valley Railway S&TSignals & Telegraph Department (unofficial) website. Link. Accessed 05/01/2015.
- Minnis, John (2012). "Railway Signal Boxes, a Review". English Heritage Research Report Series no. 28-2012. Link. Accessed 05/01/2015.
- Waugh, Andrew. "McKenzie & Holland 1873 Patent Frames". Link. Accessed 05/01/2015.