Difference between revisions of "Bewdley South signal box"
(→Diagram: Add extra description.) |
|||
| Line 1: | Line 1: | ||
[[File:Bewdley South signal box.jpg|200px|thumb|right|Bewdley South signal box]] | [[File:Bewdley South signal box.jpg|200px|thumb|right|Bewdley South signal box]] | ||
| + | [[File:BS Frame.jpg|200px|thumb|right|Interior of Bewdley South signal box]] | ||
[[File:BewdleySouthSBAward_20150315.jpg|200px|thumb|right|Award won by Bewdley South signal box]] | [[File:BewdleySouthSBAward_20150315.jpg|200px|thumb|right|Award won by Bewdley South signal box]] | ||
| Line 11: | Line 12: | ||
Signalling diagram in Bewdley South as of September 2015. The circles on the diagram are track circuit indicators, which light in the presence of a train (or failure of a track circuit), the pilot light in bottom left being constantly lit to indicate that the power is on. | Signalling diagram in Bewdley South as of September 2015. The circles on the diagram are track circuit indicators, which light in the presence of a train (or failure of a track circuit), the pilot light in bottom left being constantly lit to indicate that the power is on. | ||
| + | |||
| + | [[File:BS_BR_Era_Diagram.jpg|800px]] | ||
| + | |||
| + | The office copy of the GWR/BR-era diagram for Bewdley South. The diagram shows alterations to remove the signals and points for the Down Yard. The SVR was given control of the yard before BR ceased running services to Bewdley, and it is thought that the pointwork for the yard was never physically removed. Instead, it is theorised that the removal of these features of the diagram was done to indicate to signalmen that they were not to be used under any circumstances <ref>Severn Valley Signalmen Facebook group</ref>. | ||
| + | |||
| + | ==Labelled diagram of Block Shelf == | ||
| + | |||
| + | [[File:BS_Frame_Labelled.jpg|800px]] | ||
| + | |||
| + | The lever frame and block shelf at Bewdley South. The descriptions for the labelled items are as follows: | ||
| + | |||
| + | :A: Signal arm repeaters for Lever 0 (Down Distant, top indicator) and Lever 1 (Down Home, bottom indicator) | ||
| + | :B: Signal lamps repeater | ||
| + | :C: Possession key for Bewdley South-Kidderminster section, removed from the instrument to protect the line during engineering work, etc. | ||
| + | :D: Block bell from Kidderminster | ||
| + | :E: Block instrument to Bewdley North for Up and Down main | ||
| + | :F: Block bell to Bewdley North for Up and Down main | ||
| + | :G: Block instrument to Bewdley North for Back Road | ||
| + | :H: Block bell to Bewdley North for Back Road | ||
| + | :I: Track circuit indicator for "Tunnel Track" (extends between the distants at Bewdley South and Kidderminster, either side of Bewdley Tunnel) | ||
| + | :J: Up train accepted (by Kidderminster) indicator | ||
| + | :K: ??? indicator | ||
| + | :L: Signal 30 approach locking Free/Locked indicator | ||
| + | :M: Signal arm repeater for signal 30 (Up Starting) | ||
| + | :N: Signal arm repeater for signal 33 (Up Main Distant) | ||
| + | |||
| + | == Levers and Lever Leads == | ||
| + | |||
| + | The following photographs show the levers and lever leads at Bewdley South. | ||
| + | |||
| + | <gallery> | ||
| + | File:BS Levers 0-10.jpg | Levers 0 to 10. Lever 8 is spare. | ||
| + | File:BS Levers 7-15.jpg | Levers 7 to 15. Lever 8 is spare. Not visible is Lever 11. | ||
| + | File:BS Levers 14-21.jpg | Levers 14 to 22. Not visible is Lever 22. | ||
| + | File: BS Levers 23-33.jpg | Levers 23 to 33. | ||
| + | </gallery> | ||
| + | |||
| + | === List of levers === | ||
| + | |||
| + | {| class="wikitable" | ||
| + | ! style="text-align:left;" | No. !! style="text-align:left;" | Colour !! style="text-align:left;" | Description !! style="text-align:left;" | Lever Sequence | ||
| + | |- | ||
| + | | 0 || Yellow || From Kidderminster Distant || 1 6 | ||
| + | |- | ||
| + | | 1 || Red || From Kidderminster Home || 23 22 13 12 or 22 13 12 or 17 16 15 12 | ||
| + | |- | ||
| + | | 2 || Red/Brown || Acceptance Lever From Kidderminster || | ||
| + | |- | ||
| + | | 3 || Red || From Hartlebury To Down Main Home || 23 22 or 22 | ||
| + | |- | ||
| + | | 4 || Red || From Hartlebury To Back Platf'm Home || 17 16 15 12 10 | ||
| + | |- | ||
| + | | 5 || Red+White Band || From Hartlebury To Down Main Inner Home || 22 21 | ||
| + | |- | ||
| + | | 6 || Red+White Band || From Kidderminster To Down Main Inner Home || 22 13 12 | ||
| + | |- | ||
| + | | 7 || Red+White Band || From Kidderminster Or Hartlebury To Back Platf'm Inner Home || 17 16 15 12 11 | ||
| + | |- | ||
| + | | 8 || || SPACE || | ||
| + | |- | ||
| + | | 9 || Red || From Kidderminster To Down Sidings Inner Home || 23 22 13 12 | ||
| + | |- | ||
| + | | 10 || Black || Facings Xover || 17 16 15 12 | ||
| + | |- | ||
| + | | 11 || Blue/Brown || Interl'k'g Lever With Bewdley North For Back Road || | ||
| + | |- | ||
| + | | 12 || Brown || F.P.L.s For Nos. 10 & 13 || 22 23 13 or 22 13 or 17 16 15 | ||
| + | |- | ||
| + | | 13 || Black || From Kidderm'tr Facing / Main || | ||
| + | |- | ||
| + | | 14 || Red || Disc for No. 18 || 16 18 | ||
| + | |- | ||
| + | | 15 || Blue || F.P.L for No. 16 || 17 16 | ||
| + | |- | ||
| + | | 16 || Black || Up Main / Back Platf'm || | ||
| + | |- | ||
| + | | 17 || Blue || F.P.L for No. 18 || | ||
| + | |- | ||
| + | | 18 || Black || Back Platf'm / Siding || | ||
| + | |- | ||
| + | | 19 || Red || Disc for No. 18 || 16 18 or 17 16 15 12 10 [PUT BACK 12 15 17] 18 | ||
| + | |- | ||
| + | | 20 || Red || From Hartlebury To Down Sidings Inner Home || 23 22 21 | ||
| + | |- | ||
| + | | 21 || Black || Stourport Line Safety || | ||
| + | |- | ||
| + | | 22 || Blue || F.P.L for No. 23 || NIL or 23 | ||
| + | |- | ||
| + | | 23 || Black || Down Main Facing / Down Sidings || | ||
| + | |- | ||
| + | | 24 || Red || Disc for No. 13 || 13 | ||
| + | |- | ||
| + | | 25 || Red || Disc at No. 13 || 21 | ||
| + | |- | ||
| + | | 26 || Red || Disc for No. 23 || 13 23 24 or 21 23 25 | ||
| + | |- | ||
| + | | 27 || Blue/Brown || Interl'k'g Lever With Bewdley North For Down Main || | ||
| + | |- | ||
| + | | 28 || Red || Back Platf'm To Hartlebury Home || 17 16 15 12 10 PUT BACK 12 15 17 | ||
| + | |- | ||
| + | | 29 || Red || Up Main To Hartlebury Home || 17 16 15 12 10 PUT BACK 12 15 16 | ||
| + | |- | ||
| + | | 30 || Red+White Band || To Kidderm'tr Start'g || | ||
| + | |- | ||
| + | | 31 || Red || Back Platf'm To Kidderminster Home || 16 | ||
| + | |- | ||
| + | | 32 || Red || Up Main To KidderMinster Home || | ||
| + | |- | ||
| + | | 33 || Yellow || Up Main Distant || 32 30 | ||
| + | |} | ||
| + | |||
== See Also == | == See Also == | ||
* [[List of signal boxes]] | * [[List of signal boxes]] | ||
Revision as of 23:07, 16 October 2015


A signal box at Bewdley, working to Bewdley North and Kidderminster. Bewdley South signal box has interesting arrangements in that it works to Bewdley North by Absolute Block on the main line (platforms 1 & 2), by direction levers under ETT Regulations on the Back Road (platform 3) with the Rock Siding and DownIn reference to the direction of travel means away from the major terminus (i.e. towards Bridgnorth on the present day SVR) Yard operated as through sidings. Operation to Kidderminster is via Acceptance Lever.
The box won a National Railway Heritage Award, the Westinghouse Signaling Award, in 2007.
Diagram

Signalling diagram in Bewdley South as of September 2015. The circles on the diagram are track circuit indicators, which light in the presence of a train (or failure of a track circuit), the pilot light in bottom left being constantly lit to indicate that the power is on.

The office copy of the GWRGreat Western Railway/BRBritish Rail or British Railways-era diagram for Bewdley South. The diagram shows alterations to remove the signals and points for the DownIn reference to the direction of travel means away from the major terminus (i.e. towards Bridgnorth on the present day SVR) Yard. The SVRSevern Valley Railway was given control of the yard before BRBritish Rail or British Railways ceased running services to Bewdley, and it is thought that the pointwork for the yard was never physically removed. Instead, it is theorised that the removal of these features of the diagram was done to indicate to signalmen that they were not to be used under any circumstances [1].
Labelled diagram of Block Shelf

The lever frame and block shelf at Bewdley South. The descriptions for the labelled items are as follows:
- A: Signal arm repeaters for Lever 0 (DownIn reference to the direction of travel means away from the major terminus (i.e. towards Bridgnorth on the present day SVR) Distant, top indicator) and Lever 1 (DownIn reference to the direction of travel means away from the major terminus (i.e. towards Bridgnorth on the present day SVR) Home, bottom indicator)
- B: Signal lamps repeater
- C: Possession key for Bewdley South-Kidderminster section, removed from the instrument to protect the line during engineering work, etc.
- D: Block bell from Kidderminster
- E: Block instrument to Bewdley North for UpIn reference to the direction of travel means towards the major terminus (i.e. towards Kidderminster on the present day SVR) and DownIn reference to the direction of travel means away from the major terminus (i.e. towards Bridgnorth on the present day SVR) main
- F: Block bell to Bewdley North for UpIn reference to the direction of travel means towards the major terminus (i.e. towards Kidderminster on the present day SVR) and DownIn reference to the direction of travel means away from the major terminus (i.e. towards Bridgnorth on the present day SVR) main
- G: Block instrument to Bewdley North for Back Road
- H: Block bell to Bewdley North for Back Road
- I: Track circuit indicator for "Tunnel Track" (extends between the distants at Bewdley South and Kidderminster, either side of Bewdley Tunnel)
- J: UpIn reference to the direction of travel means towards the major terminus (i.e. towards Kidderminster on the present day SVR) train accepted (by Kidderminster) indicator
- K: ??? indicator
- L: Signal 30 approach locking Free/Locked indicator
- M: Signal arm repeater for signal 30 (UpIn reference to the direction of travel means towards the major terminus (i.e. towards Kidderminster on the present day SVR) Starting)
- N: Signal arm repeater for signal 33 (UpIn reference to the direction of travel means towards the major terminus (i.e. towards Kidderminster on the present day SVR) Main Distant)
Levers and Lever Leads
The following photographs show the levers and lever leadsThe (usually brass) information panel on a point or signal lever informing the signalman which other levers need to be pulled to release that lever at Bewdley South.
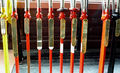
Levers 0 to 10. Lever 8 is spare.
Levers 7 to 15. Lever 8 is spare. Not visible is Lever 11.

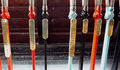
Levers 14 to 22. Not visible is Lever 22.
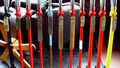
Levers 23 to 33.


List of levers
| No. | Colour | Description | Lever Sequence |
|---|---|---|---|
| 0 | Yellow | From Kidderminster Distant | 1 6 |
| 1 | Red | From Kidderminster Home | 23 22 13 12 or 22 13 12 or 17 16 15 12 |
| 2 | Red/Brown | Acceptance Lever From Kidderminster | |
| 3 | Red | From Hartlebury To DownIn reference to the direction of travel means away from the major terminus (i.e. towards Bridgnorth on the present day SVR) Main Home | 23 22 or 22 |
| 4 | Red | From Hartlebury To Back Platf'm Home | 17 16 15 12 10 |
| 5 | Red+White Band | From Hartlebury To DownIn reference to the direction of travel means away from the major terminus (i.e. towards Bridgnorth on the present day SVR) Main Inner Home | 22 21 |
| 6 | Red+White Band | From Kidderminster To DownIn reference to the direction of travel means away from the major terminus (i.e. towards Bridgnorth on the present day SVR) Main Inner Home | 22 13 12 |
| 7 | Red+White Band | From Kidderminster Or Hartlebury To Back Platf'm Inner Home | 17 16 15 12 11 |
| 8 | SPACE | ||
| 9 | Red | From Kidderminster To DownIn reference to the direction of travel means away from the major terminus (i.e. towards Bridgnorth on the present day SVR) Sidings Inner Home | 23 22 13 12 |
| 10 | Black | Facings Xover | 17 16 15 12 |
| 11 | Blue/Brown | Interl'k'g Lever With Bewdley North For Back Road | |
| 12 | Brown | F.P.LFacing Point Lock, equipment that physically locks points so that they cannot move..s For Nos. 10 & 13 | 22 23 13 or 22 13 or 17 16 15 |
| 13 | Black | From Kidderm'tr Facing / Main | |
| 14 | Red | Disc for No. 18 | 16 18 |
| 15 | Blue | F.P.LFacing Point Lock, equipment that physically locks points so that they cannot move. for No. 16 | 17 16 |
| 16 | Black | UpIn reference to the direction of travel means towards the major terminus (i.e. towards Kidderminster on the present day SVR) Main / Back Platf'm | |
| 17 | Blue | F.P.LFacing Point Lock, equipment that physically locks points so that they cannot move. for No. 18 | |
| 18 | Black | Back Platf'm / Siding | |
| 19 | Red | Disc for No. 18 | 16 18 or 17 16 15 12 10 [PUT BACK 12 15 17] 18 |
| 20 | Red | From Hartlebury To DownIn reference to the direction of travel means away from the major terminus (i.e. towards Bridgnorth on the present day SVR) Sidings Inner Home | 23 22 21 |
| 21 | Black | Stourport Line Safety | |
| 22 | Blue | F.P.LFacing Point Lock, equipment that physically locks points so that they cannot move. for No. 23 | NIL or 23 |
| 23 | Black | DownIn reference to the direction of travel means away from the major terminus (i.e. towards Bridgnorth on the present day SVR) Main Facing / DownIn reference to the direction of travel means away from the major terminus (i.e. towards Bridgnorth on the present day SVR) Sidings | |
| 24 | Red | Disc for No. 13 | 13 |
| 25 | Red | Disc at No. 13 | 21 |
| 26 | Red | Disc for No. 23 | 13 23 24 or 21 23 25 |
| 27 | Blue/Brown | Interl'k'g Lever With Bewdley North For DownIn reference to the direction of travel means away from the major terminus (i.e. towards Bridgnorth on the present day SVR) Main | |
| 28 | Red | Back Platf'm To Hartlebury Home | 17 16 15 12 10 PUT BACK 12 15 17 |
| 29 | Red | UpIn reference to the direction of travel means towards the major terminus (i.e. towards Kidderminster on the present day SVR) Main To Hartlebury Home | 17 16 15 12 10 PUT BACK 12 15 16 |
| 30 | Red+White Band | To Kidderm'tr Start'g | |
| 31 | Red | Back Platf'm To Kidderminster Home | 16 |
| 32 | Red | UpIn reference to the direction of travel means towards the major terminus (i.e. towards Kidderminster on the present day SVR) Main To KidderMinster Home | |
| 33 | Yellow | UpIn reference to the direction of travel means towards the major terminus (i.e. towards Kidderminster on the present day SVR) Main Distant | 32 30 |